Tuesday, March 26, 2013

Everything But the Bathroom Sink

by Billy Aldridge

During the past few weeks I have shown you how to slay the "Thing in the Bathtub."  I have also demonstrated how to safely and effectively clear a clogged kitchen sink.  But the one thing I haven't shown you is how to maintain the bathroom sink.  Just like the kitchen sink, the reason that the one in the bathroom gets gunked up has to do with diet.  Whereas the kitchen sink is forced to eat everything from vegetable peels to chicken fat (neither of which are good for the disposal), the bathroom sink has to contend with everything from shave cream and toothpaste to hair.  With a diet like that it isn't unusual for the bathroom sink to get a case of indigestion and slow to a crawl or even stop up altogether.  If that should happen to you, do not panic.  Because I will show you how to clear most drain problems without having to call yours truly, the plumber.

How to Avoid Pain in the Drain

plumbing, too
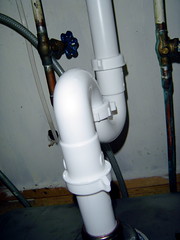
plumbing, too (Photo credit: found_drama)
The biggest mistake that most people make is to ignore the warning signs of an impending clog.  Since the single biggest culprit in the bathroom is hair, the longer you ignore the problem, the more difficult it will get to remedy the situation.  Hair has a tendency to latch onto any and every prouberance, then stubbornly knot itself into a hairball.  That's the bad news.
The good news is that nine times out of ten, the clog will reside with the Popup Assembly, which is the connection under the sink that lets you open and close the drain.  Located justabove the P-Trap, the Popup Assembly is a natural gathering point for hair.  By disassembling the assembly (see video below), you will be able to remove any hairballs that have begun to impede the smooth flow of water.  Once finished, reassemble the trap and run hot water down the drain.  If the sink continues to drain slowly, this means that the clog is located yet deeper down the drain.


At this point, many of you will probably reach for a bottle of drain cleaner.  This would be a mistake.  In the first place, as I have pointed out earlier blogs, most drain cleaners rely on corrosive compounds that are not only dangerous to handle, they also have a tendency to eat right through most pipes if used frequently enough.  Take it from a plumber, this is not something that any professional would use to clear a clog.  If you insist on using a liquid, try this homebrew first.  It is guaranteed neither to eat your pipes nor send you to the ER if you splash some on yourself.

Recipe for homemade drain cleaner
1/2 cup baking soda
1 cup of vinegar
1/2 gallon of hot (not boiling) water

To start with, pour a half cup of dry baking soda into the drain opening. Next, pour one cup of vinegar on top of the soda and let this mixture do its thing for thirty minutes or so. Last but not least pour a half gallon of hot water into the drain.  (If you bring the water to a boil you may melt your pipes if they are plastic.) 

Consumer Reactions to the Rubbermaid Clean & D...
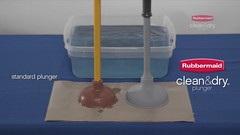
Consumer Reactions to the Rubbermaid Clean & Dry™ Plunger with NeverWet™ Superhydrophobic Nanotechnology (Photo credit: Rubbermaid Products)
If the water still doesn't drain, I would next recommend the use of a plunger. (Just make sure that you let the water in the sink cool for a bit so you don't burn yourself.)  The homemade drain cleaner plus the hot water should soften up whatever is blocking the drain.  By applying the plunger after this procedure, there is a high probability that the clog can be remedied by a vigorous applicationsome old fashioned elbow grease.

If the clog still refuses to budge, step three is to crawl beneath the sink and see if the P-Trap is to blame.  Particularly if there are small children in the home, it is entirely possible that a toy or some other element that was never intended to go down the drain has become lodged in the sinuous confines of the P-Trap.  Before taking a wrench to loosen the trap, make sure you place a basin or bucket directly underneath, since any water contained in the trap is going to come out. Once the trap is undone at both ends, remove it and turning it upside down, see if anything besides water comes out.

If the trap is clear, that means that the clog is located still further down the drain.  If that's the case, then you need to click over to my blog, "Eliminating Pain in the Drain."  


While there are some instances where you will need to call in a professional, when it comes to the care and feeding of your bathroom drain, the most important thing is to nip the problem in the bud by tackling a slow drain before it turns into a clogged drain.  I routinely clear the popup assembly and run a sink full of hot water down the drain on a monthly basis to keep the pipes clear.  With proper preventive maintenance, you too can keep your bathroom sink flowing freely and help avoid pain in the drain.

Billy Aldridge is one of the Doctors of Plumbology at Aldridge and Sons Plumbing in Jacksonville, Florida.  Visit their site for more how-to blogs and videos as well as 24/7 service for all your plumbing Jacksonville FL needs.  http://plumbing-jacksonville-fl.com


Enhanced by Zemanta

Tuesday, March 19, 2013

The Thing in the Bathtub


By Billy Aldridge

It’s ugly, it’s hairy and it lives in your bathroom.  It likes nothing better than to hunker down and slow the water flowing out of your tub to a crawl.  It will stop up the flow altogether if you give it half a chance.  You know what I’m talking about…the Thing in the Bathtub!


Or, the bathtub drain to be more precise.  Due to the architecture of the typical bathroom drain, it has a propensity to gather up hair and lint and other forms of yuck into a ball that slowly but surely impedes the flow of water.  If you notice that your tub has begun to drain slowly and you don’t see the familiar little waterspout when the plug has been pulled, do not panic.  Most likely the trap just needs to be cleaned. 

To accomplish this, you will need a pair of needle nosed pliers.  Start by removing the drain cover.  (See the video below for more details.)  You will need the pliers to unscrew this item.  Be sure you clean the underside of the cover itself since it tends to collect gunk.  Then set the cover aside.  Next you can then use the needle nose pliers to fish out the hair that is usually a couple of inches down the drain.  Throw the hairball away and with the cover removed, run the water.  Nine times out of ten, this is all it takes to subdue the Thing in the Bathtub.  If the water runs freely, replace the drain cover and you’re good to go.


However, it the water does not drain quickly, this means there is yet another clog further down the pipe.  If you own a drain claw, you can snake the cable down the pipe.  (If not, you can try a wire hanger with a bent hook at the end.)  When you meet resistance you have in all likelihood located the clog.  To dislodge it you need to twist the claw so that it grabs the hairball and then slowly pull it out.  Do NOT attempt to push the clog down the pipe or you will only result in lodging the hairball even more firmly.  Hopefully the clog isn’t so deep that you can’t fish it out. 

If the water still runs slowly down the drain, you can try pouring a pot of hot (not boiling) water down the drain.  Let it stand twenty minutes and then try using a plunger.  Be careful to avoid splashing the hot water on yourself.  Also if the water is too hot you may accidentally melt the sealant used to connect the pipes, causing a new plumbing problem. 

I strongly advise against the use of caustic drain cleaners, since they pose a danger to yourself and your pipes.  The trick to avoiding harsher measures is to clean out the drain on a regular basis.  I recommend cleaning the drain once every three months. This will keep the pipes from creating a monster that only a professional can deal with and keep the Thing in the Bathroom at bay.

Billy Aldridge is one of the Doctors of Plumbology at Aldridge and Sons Plumbing in Jacksonville, Florida.  For even more helpful tips and how-to videos, visit their site at http:/./plumbing-jacksonville-fl.com

Tuesday, March 12, 2013

Eliminating Pain in the Drain


By Billy Aldridge

We’ve all been there, trying to put our game face on first thing in the morning, either trying to shave or fix our hair when we hear that annoying sound coming at us from out of the bathroom sink.  Glug, glug, glug.  Or perhaps it last happened to you when you finished doing the dishes and pulled the plug on the kitchen sink only to watch as the water stubbornly refuses to go down.  You know what I’m talking about.  I call it the pain in the drain.  You may have some more colorful ways to describe the situation when it happens to you.  But like it or not, drain clogs come to all of us from time to time.  Sometimes they are the kind that you can unclog them on your own and sometimes they are the stubborn kind that requires professional help to clear. Well fear not, because in the next few minutes I am going to show you the care and feeding of your household drains.

English: Drain cleaner as sold in the hardware...
English: Drain cleaner as sold in the hardware shop which contains 99+% NaOH. (Photo credit: Wikipedia)
In the first place the worst time to tackle the problem is when the sink is stopped up.  More often than not, t
he pipes will give you subtle warning signs that a stoppage is imminent, by either slowing the outflow of water to a crawl or by making those strange intestinal noises, the ones most humans make after eating either Cajun cuisine or hot chili.  When most people detect either of these problems they usually reach for one of those caustic drain cleaners.  This is their first mistake.  While this kind of product might temporarily open up the drain, it also exposes you to two potential dangers.  The first is a chemical burn you could self-inflict if any of the product gets on you.  The second is erosion of and possible rupture of your pipes that can come from repeated use of these products.

If you want to try a chemical solution to a slow drain, try this no-caustic recipe that’s guaranteed not to burn you or your pipes.  Put ½ cup of baking soda mixed with ¼ cup of salt into the drain.  Follow this by pouring ½ cup of vinegar.  Then let the mixture sit for 20 minutes and then run hot water for a minute followed by cold water for one minute.  While this procedure won’t break up the most stubborn of clogs, it is a recipe used in conjunction with a plunger can improve flow without harming either you or the pipes. 


Send in the Snake

If your sink is completely stopped up and the plunger won’t clear the clog, it’s time to send in the snake.  Known as an auger in the trade, this is the long slender contraption that fits down most drains and is capable of making it around the tight turns in most pipes.  Some augers are meant to be used by hand and others are designed to be attached to a drill or other motorized device.  Just as with caustic cleaners, you want to exercise caution when using power augers.  The last thing you want to do is save some money on a drain cleaning job only to wind up in the ER.

English: Handheld Drain Auger
English: Handheld Drain Auger (Photo credit: Wikipedia)
Manual augers can be purchased at most any hardware store.  They usually come in 10-foot lengths and have a t-shaped handle at one end and a coiled head at the other.  If the clog is located close to the sink, 
manual augers can be a godsend.  By simply threading the snake down the drain and turning the handle these handy helpers are designed to grab and retrieve hairballs, grease wads and other yuck that’s situated in the first few feet of pipe.  However, if the clog isn’t located near the drain you need to be aware that clearing a clog can take as much as 50 feet of cable to reach and is not something that anyone but a professional should attempt.

Preventative Maintenance

Besides, with a little preventative maintenance, you won’t need to call out the plumber so often.  One of the best ways to keep a drain clear and clean is to fill the sink once per month to the top with hot water and a couple of drops of dish detergent.  Once the sink is full, pull the plug and allow the hot water to run full tilt with the water still running until the sink empties.  You will know that you have a happy drain if you see that little water spout come up in the middle of the sink followed by a sound not unlike my nephew finishing off the last of his slurpy.  That means that your pipes are able to handle the flow. You can also use the homemade drain cleaner that I told you about above as a monthly maintenance measure as well.  After all, clean pipes are happy pipes.

Next week I am going to show you how to clean out the cleanouts in my latest DIY video.  So stay tuned and be safe.  Always wear goggles and gloves when handling any caustic substances.  No pain in the drain is worth a hospital stay.

Billy Aldridge is one of the Doctors of Plumbology at Aldridge and Sons Plumbing in Jacksonville, Florida.  Visit his site at http://plumbing-jacksonville-fl.com for even more helpful hints and DIY videos.

Enhanced by Zemanta

Thursday, March 7, 2013

Spout Off

by Billy Aldridge

Last week we talked about bathrooms from around the world. Even though water shut off valves are not as glamorous and sexy as high tech bathrooms they are probably more important to the average consumer. Face it, if you have ever had a waterline break start spouting a geyser in the kitchen, bathroom or anywhere else in your home you know exactly what I’m talking about. The first thing to do when something like this occurs is to reach for the nearest shut off valve and hope that the valve closes all the way. If it doesn’t you have to find the main shut off valve and deal with the mess afterwards. This is why I chose this topic today. You'd be surprised at how many people don't know where their shut off valves are located, let alone whether they operate properly.  Hopefully we can prevent disaster from happening to you with just a few simple tips. Here they are.

Main Shut Off Valve

In a real emergency you and your family members need to know where the main shut off valve is located. This is extremely important because when all else fails such as the shut off valve under the sink refusing to 
English: Ball valve used in commercial water a...
English: Ball valve used in commercial water applications. Sometimes referred to as a ball valve valve. (Photo credit: Wikipedia)
close or it won’t turn at all, you will need to go to the main shut off valve to stop the waterspout. This will shut off all the water throughout the entire house. If you cannot find the main shut off valve you should be able to locate it by reading your home inspection paperwork that you received when you purchased your home. Also a quick call to your local plumber may be able to guide you to its location if you can’t find your home inspection paperwork.

There are three types of shut off valves: Gate Valve, Stop Valve and Ball Valve. Since these are the most important shut off valves in your home, you need to know where they are located and what to do to stop the flow. Ideally you can stop the flood at its location so you won’t have to rush to the main shut off outside. If you would like to know more about these valves you can go to http://www.startribune.com/local/yourvoices/179261121.html

THREE SIMPLE STEPS


  1. 1.      Locate all your interior shut off valves throughout the house. You will find them under your bathroom sink, near the base of your toilets, under the kitchen sink, as well as where your hoses hook up for your washing machine.
  2. You should open and close each of these valves at least once per year.
  3.  Should the valve only close part way, try spraying a little WD 40 below the handle and then turn the water off and back on. 
  4. If any valve refuses to budge, spray WD-40 on the valve and allow it to sit for at least 30 minutes. 
  5. If that still doesn't do the trick you will need to use a screwdriver to loosen the bonnet nut located where the shaft meets the valve body.. Try to work the nut loose gradually.  Forcing it could result in snapping off the shaft. Turn the valve once the bonnet nut is loose. 
  6. Beyond that you will need to contact a plumber since the next step is to use a torch.
SUMMARY

     I hope this blog helps save you from having to recover from a lot of water damage to your home which can occur anywhere you have a plumbing leak.  Just remember that in order to keep your home in tip top condition you need to maintain the plumbing. Thank you for reading this article. Any comments or posts will certainly be appreciated. 

Billy Aldridge is one of the Doctors of Plumbology at Aldridge and Sons Plumbing in Jacksonville, Florida.  Visit their site for more helpful tips and how-to videos at 
http://plumbers-jacksonville-fl.com

Enhanced by Zemanta